2.1 The Companion Robot
A fun, low-cost DIY companion robot built with an ESP32, featuring interactive OLED eye animations, motion tracking, and touch capabilities.
Overview
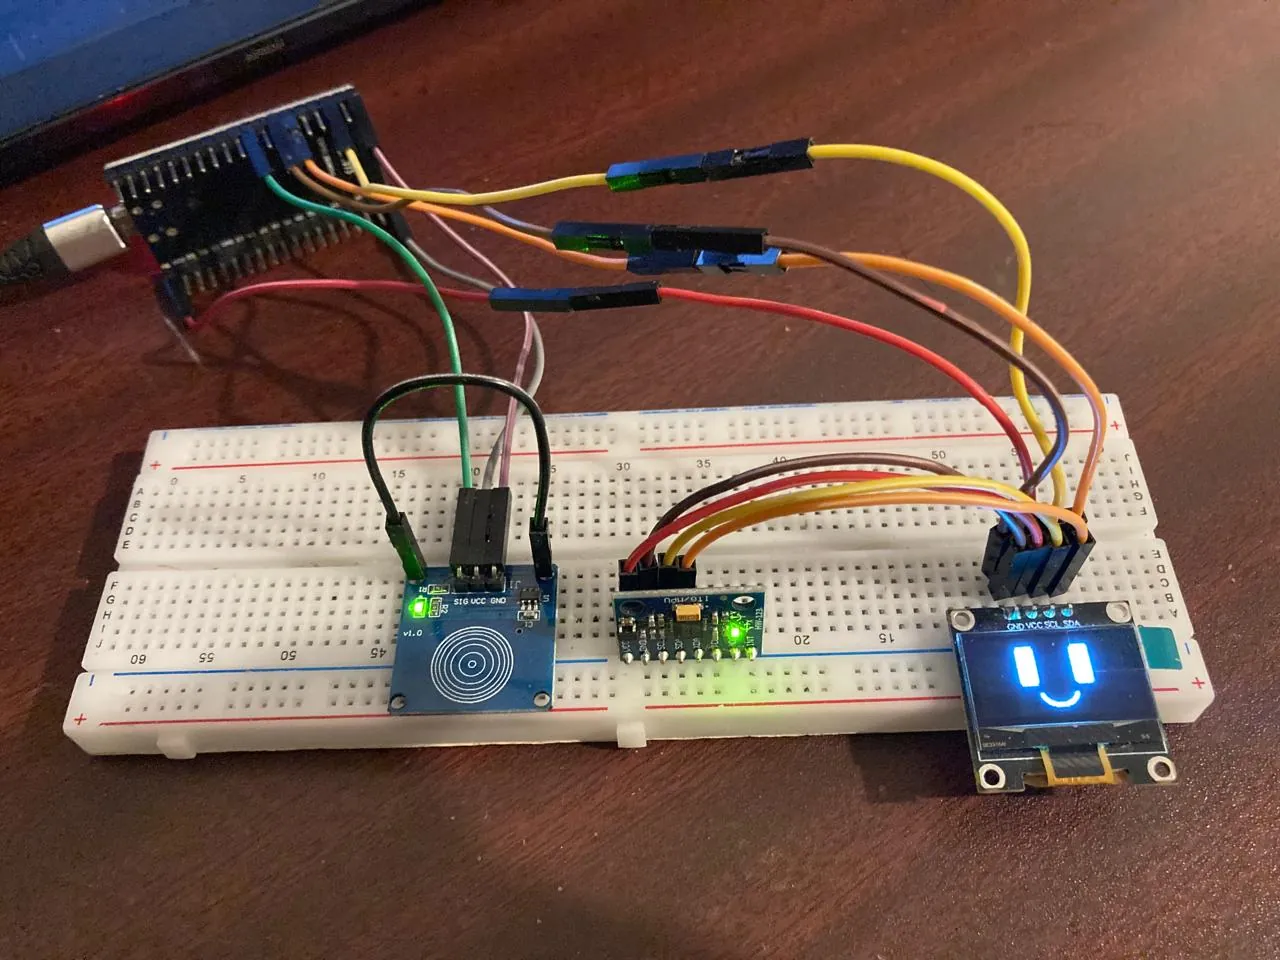
There are lots of companion robots out there with impressive features, but I wanted to build something highly accessible. As my first ESP32 project, I decided to create a DIY companion robot named 2.1. It’s incredibly fun to have a reactive companion on your desk when working alone!
This prototype uses simple, minimal components that anyone can find easily and at a very low cost on e-commerce sites. I specifically chose the ESP32 over the standard Arduino Uno because it provides built-in Wi-Fi and Bluetooth capabilities, along with much higher memory and processing power—essential for handling animations and sensor data simultaneously.
Tech Stack
| Layer | Technology / Component |
|---|---|
| Microcontroller | ESP32 Board |
| Display | SSD1306 I2C 128x64 OLED Display |
| Sensors | MPU6050 (6-axis motion), Capacitive Touch Sensor |
| Software Engine | Arduino IDE (C++) |
| Animation Pipeline | Rive (Design) → image2cpp (C++ Bitmap Conversion) |
| AI Assistance | ChatGPT, Perplexity, DeepSeek |
Features
-
Expressive Animations: Utilizes a 128x64 OLED display to render lively, interactive eye animations.
-
Motion Tracking Interactivity: Integrates an MPU6050 accelerometer and gyroscope to detect movement, allowing 2.1 to change its expressions based on physical interaction.
-
Touch Commands: Features a capacitive touch sensor (
GPIO 18) to directly interact with the robot and issue commands via simple taps. -
Configurable Firmware: Offers two distinct firmware versions to suit different needs:
V_1.6_smooth_animation.ino: Prioritizes butter-smooth frame rates at the cost of flash memory.V_1.7_optimized.ino: Highly optimized to save storage space, leaving room for future feature expansions.
-
Custom Idle Animations: The robot occasionally plays custom eye animations automatically, making it feel truly alive and reactive on your desk.
Lessons Learned
Hardware Communication & Interfacing: Getting multiple components to communicate over the I2C bus (the OLED display and the MPU6050 sensor sharing SDA and SCL pins) provided deep hands-on experience with hardware protocols and breadboard prototyping.
Memory vs. Performance Trade-offs: Microcontrollers have strict resource limits. Creating two versions of the code (V_1.6 and V_1.7) was a practical lesson in optimization. I had to consciously weigh the benefits of smooth animation frames against the available flash memory needed for future feature implementations.
Modern Development Pipelines: I learned how to bridge modern UI/UX tools with low-level C++. Using Rive to design the animations, and then routing those PNG sequences through image2cpp to generate C++ bit-maps, taught me how to handle graphics on embedded systems. Additionally, leveraging AI models helped immensely in debugging complex C++ logic and accelerating the development process.
Custom Animation Design & Conversion: A completely new skill I learned from this project was creating and handling custom graphics for embedded systems. I custom-designed the eye animations using the Rive online platform. I then had to figure out how to convert those designs into C++ bit-maps so the microcontroller could actually read and occasionally play them on the OLED screen.